Go Green!

Progress Update: A Beautiful, Sustainable Wall Takes Shape

If you've been following our progress, you know that Sunset Green Home was required to elevate the project's sanitary system to where its base would be three feet above groundwater.  Because of the property's high water table, doing so required creating an elevated septic field bounded by a sizable retaining wall

Sunset Green Home's retaining wall and footings during construction.

Sunset Green Home's retaining wall and footings during construction.

The wall runs the length of the driveway and along the street.  We'll be installing native plantings at the base of the wall, and Sunset Green Home's lawn at the top.

We had many choices for finishing the wall - stucco, natural stone, and architectural manufactured stone - to name a few.  We selected Eldorado Stone's manufactured lightweight concrete Nantucket Stacked Stone for its sustainable properties, natural stone look and ease of installation. 

Because Sunset Green Home is seeking LEED Platinum certification at completion, our team is very concerned about the sustainable characteristics of the materials that are used in the project.  The Nantucket Stacked Stone panels we used were manufactured in Pennsylvania - well within the 500 mile radius that the LEED green building program targets for "regional" materials.  Eldorado Stone weighs roughly half the weight of natural stone, which means fewer resources were expended in transporting it to the site.  The lighter weight also translates to faster, more cost-effective installation.  Made of concrete, Eldorado Stone is completely recyclable at the end of its life (but with a 50-year warranty, we're not expecting to retire the stone wall anytime soon).  

Installation of the wall began on a rainy day, so the team used tarps to keep the work moving along!  Photo courtesy of Chris Mensch, Coastal Management.

Installation of the wall began on a rainy day, so the team used tarps to keep the work moving along!  Photo courtesy of Chris Mensch, Coastal Management.

In fact, the Nantucket Stacked Stone was so quick to install, Sunset Green Home's concrete retaining wall went from bare to finished in two short weeks!  Now that the wall is complete, let the planting begin!

Two weeks later, the wall is finished and capped, and the area around it is ready for planting! Photo courtesy of Chris Mensch, Coastal Management.

Two weeks later, the wall is finished and capped, and the area around it is ready for planting! Photo courtesy of Chris Mensch, Coastal Management.

Practical Sustainability: Green Landscaping Ideas That Won't Break the Bank

Daffodils in Bloom

Spring has (finally!) sprung...

After the long, cold winter of 2015, it's nice to see the crocuses and daffofils pushing their way out of the ground and the trees budding into leaf.  In honor of spring's arrival, this month's Practical Sustainability column focuses on sustainable landscaping ideas that won't break the bank.

  1. Compost!  When you do your spring cleanup, consider adding the leaves you rake up to a compost pile or compost bin.  Save money by making your own compost, and then use it to feed and mulch your plantings.  Click here for compost solutions you can build yourself.
  2. Fertigate!  If you have an automated irrigation system, consider adding a "fertigation" solution - like EZ-FLO -  to your system.  Plants absorb nutrients better when fertilizer is "watered in."  For a few hundred dollars, your irrigation system can deliver low doses of fertilizer to your landscape with greater efficiency and less risk of runoff than if you use topical fertilizers.  
  3. Set Timers!  When you start your irrigation system back up this spring, consider setting automatic timers to water early in the morning when evaporative losses will be lowest, and adjust sprinkler heads to make sure that you aren't sending water onto the sidewalk or into the street in front of your home.
  4. Use Drought Tolerant Grass!  While overseeding (the practice of adding new grass seed to an existing lawn) is best undertaken in the fall months, some people practice overseeding in the spring.  If you can't overseed in the fall and choose to do so now, consider a drought-tolerant grass variety that, once established, will be less thirsty than a typical lawn.
  5. Capture Rainwater!  If it's legal in your region, consider capturing rainwater from the April showers to water your May flowers.  Adding a rainwater catchment system is as easy as installing a rain barrel at your gutter downspout, and then installing a filter and pump so you can use the water in your planting beds or lawn.  By capturing rain water, you're also protecting the environment against the negative effects of storm water runoff.  Click here for simple DIY rain barrel instructions. 
  6. Plant Drought Tolerant Ornamentals! Pick your ornamental plants carefully.  Consult your local Extension service for a list of drought tolerant and native/adaptive plant varieties that will thrive in your region with lower water use.  Cornell's extension division publishes plants lists for many regions, including Long Island where Sunset Green home is located.
  7. Choose Perennials!  Substitute perennials into beds where you typically plant annuals.  Perennials live longer and establish deeper roots. You'll spend less on your plants, and will save water throughout the season.

Planting season is here.  Use sustainable practices to minimize water use and reduce your impact on the environment!

Get to Know LEED®: Central Vacuum for Contaminant Control

Sunset Green Home is about to close up its walls.  Electrical and plumbing inspections have been completed. And installation of insulation is underway.  We're only a few days away from beginning to install the home's drywall.

On a recent visit, I snapped a few photos of an important system that is installed inside the home's walls: our BEAM Alliance central vacuum system.  Most households own a vacuum cleaner, but did you know that the LEED for Homes green building program awards a point toward LEED certification to projects that install a central vacuum system with exhaust to the outdoors? 

Here's why...

According to the LEED for Homes Reference Guide, "a majority of the dirt and dust in homes is tracked in by occupants.  Debris carried into the house from shoes often contains lead, asbestos, pesticides, and other hazardous materials...Central vacuums exhaust collected dust and particulates to the outdoors."

In last month's Practical Sustainability column, I advocated taking one's shoes off inside the house.  We do it at home, and find that our home stays cleaner and requires less maintenance.  But even when we remove our shoes, we still find that our floor needs to be vacuumed.  Conventional vacuums recirculate the air they use to draw dirt inside.  Even the best filters still exhaust the smallest particulates back into the room.  By contrast, since LEED compliant central vacuums exhaust the air outdoors, any particulates that are picked up by the vacuum will either be trapped by the system or exhausted to the home's exterior.

Central vacuum systems are easy to install in new construction (and can also be retrofitted into existing homes).  Inlet valves are installed in the walls or baseboards as in the photo below:

The wall inlet valves are connected to vacuum piping, which runs to the power unit (located in the home's mechanical room, in the case of Sunset Green Home.  Note, in the photo below, the low voltage wire that runs along the piping, enabling the vacuum handle to communicate with the power unit in a BEAM Alliance system.

Sunset Green Home will earn one point toward certification by installing a central vacuum system.  We're using the BEAM Alliance - 650SB model, which features a hose handle that communicates with the power unit located in Sunset Green Home's mechanical room.  The bells and whistles are nice to have, but what makes us really happy is the knowledge that we're installing a system designed to improve Sunset Green Home's indoor air quality.


Progress Update: AquaSAFE Fire Sprinkler System Installation

When Hurricane Sandy left the previous home on the site of Sunset Green Home "substantially damaged" we knew we would be required to rebuild in compliance with current building codes.  The old house stood at five feet above sea level.  Current code would elevate the new home to 12 feet above sea level.  But, having seen the destructive nature of the Hurricane Sandy storm surge, the Sunset Green Home team opted to go even further and to build the house at 14 feet above sea level.

So what does that have to do with fire sprinklers?

First, a bit of background...The International Residential Code (IRC) is a comprehensive building code that governs one- and two-family dwellings.  The version of the IRC that was adopted in 2009 calls for homes to include fire sprinkler systems.  While the IRC provides building code guidelines, states and local municipalities have the option of adopting the code in whole or in part. 

New York State adopted the fire sprinkler recommendations for homes with three stories.  Homes with two floors of living space may be characterized as three-story homes - requiring compliance with the IRC fire sprinkler requirements - if the first floor of livable space is high enough above grade that the basement area is considered a "story" itself (there are three "tests" - which you can read about here).

Sunset Green Home's elevation came within inches of the three-story home characterization, despite the home only having two floors of living space.  While fire sprinklers were ultimately deemed unnecessary, our research led the team to go beyond the requirement and include a fire suppression system nonetheless.  Building codes are changing, and we believe that eventually all new construction will include fire sprinklers.  We would like the home to remain compliant even when the building code is changed. 

More importantly, however, our reasons for electing to include the system include the desire to

  • Provide extra time for occupants to exit the building in the event of a house fire and protect first responders who may have to enter a burning building.  Because fire sprinklers activate immediately upon detection of a fire, they may contain a fire long enough for occupants to exit the building.  Similarly, sprinklers may also reduce the intensity of a fire during the crucial period between a fire's outbreak and the arrival of fire fighters and other first responders.
  • Reduce the amount of damage to the home should it experience a house fire.  Fire sprinklers only activate in the vicinity of a fire (each head is individually activated by the heat of the fire), enabling fire suppression with minimal water damage.
  • Protect the environment.  A 2010 study by property insurer FM Global found that the volume of wastewater generated fighting a sprinklered fire may be 50% - 91% less than the amount generated in a non-sprinklered fire.  The study also observed that "fewer persistent pollutants, such as heavy metals, and fewer solids were detected in the wastewater sample from the sprinklered test compared to that of the non-sprinklered test."
  • Reduce the home's operating cost by earning insurance premium credits, which may be as high as 13% for sprinklered homes.

Having decided to include a fire sprinkler system, Sunset Green Home reached out to Uponor about its AquaSAFE system, which integrates into the cold water plumbing loop.  Uponor's in-house Design Services group designed the system based on Sunset Green Home's architectural plans and water pressure data.  Uponor offers this sprinkler system design as a value-added service to AquaSAFE clients.  The company provides a 25 year warranty on the pipes and fittings. In addition, through its manufacturer's representative, Wales-Darby, Uponor provided its AquaSAFE Levels I and II classes with classroom and on-the-jobsite training to John M. Kubisa Plumbing & Heating, Sunset Green Home's licensed plumbing subcontractor.

As of this Progress Update, all of Sunset Green Home's sprinkler heads have been installed, and the plumbing loops have been completed.  The local building inspector will conduct a pressure test before the ceilings are enclosed with fire-rated gypsum board by CertainTeed.

Stay tuned for additional updates as the installation and testing of Sunset Green Home's fire sprinkler system is completed.

Progress Update: Let There Be Lights!

Sunset Green Home's ceilings are complicated.  They're packed with:

  • 3" ducts connecting to the home's ComfoAir mechanical ventilation system by Zehnder, which supplies fresh air to the bedrooms and living areas while removing stale air from the bathrooms and kitchen
  • Short duct runs that connect to the five air handlers that comprise the home's Mitsubishi Hyper Heating INVERTER multi-zone heating and cooling system
  • Circulation loops and sprinkler heads for Sunset Green Home's AquaSAFE fire sprinkler system by Uponor.  

And, as of this week, the ceilings now include Sunset Green Home's ELEMENT LED down lights by Tech Lighting. 

If you have ever shopped for recessed light fixtures, your know that your options are extensive.  There are fixtures for new construction and remodeling; housings for insulated ceilings and non-insulated ceilings; trim options in multiple sizes and shapes; wet-rated fixtures and those intended for dry locations; down lights and wall washers; a wide range of apertures; and numerous lamping options, including LED, incandescent, fluorescent and halogen.  

So what are we using in Sunset Green Home, and how did we choose?

With Sunset Green Home's aggressive energy efficiency goals, our top priority was to select LED fixtures for all of the home's lighting.  While we could have used LED bulbs in non-LED fixtures, we wanted fixtures that had been designed with native LED technology.  Each of Sunset Green Home's ELEMENT LED downlights uses approximately one-fifth the energy of an incandescent bulb with comparable light output.

Four ELEMENT LED adjustable recessed down lights in with square trim in the TV room

Four ELEMENT LED adjustable recessed down lights in with square trim in the TV room

We specified 4" aperture fixtures throughout the project for design consistency.  The bathrooms will feature round trim, as there will be round sprinkler heads and round exhaust ducts for the Zehnder ComfoAir ERV system also in the bathroom ceilings.  Elsewhere, we specified square trim for a more contemporary aesthetic.  

Two round wet-rated recessed fixtures for the guest room shower

Two round wet-rated recessed fixtures for the guest room shower

Our lighting design includes multiple layers of light, which come from recessed down lights and wall washers, surface mounted lights, sconces and lamps.  The ELEMENT LED downlights provide general lighting, while wall washer styles illuminate larger walls and direct light out toward the perimeter of the rooms.

Wall washers in the guest bedroom

Wall washers in the guest bedroom

Recessed fixture housings for insulated ceilings (IC housings) are generally more expensive than non-IC housings, but must be specified where fixtures will come into contact with insulation.  Sunset Green Home's second floor ceilings are not insulated (insulation in Sunset Green Home's building envelope is at the roof rafters instead of in the attic floor).  To control cost, we chose non-IC housings for the first floor as well, electing to restrict the use of sound-dampening insulation to the ceiling bays that do not contain recessed fixtures, and substituting SilentFX drywall by CertainTeed in those ceilings where we need additional noise attenuation.

Wall washers in second floor uninsulated ceiling

Wall washers in second floor uninsulated ceiling

The award-winning ELEMENT LED downlights by Tech Lighting have all of the characteristics that Sunset Green Home's team sought for the project's recessed fixtures.  ELEMENT has been designed for maximum flexibility:

  • Adjustable lamp positioning to manage the tradeoff between maximizing light output vs. minimizing glare
  • Flexibility to swap out light engines from below the ceiling as the technology evolves or if changes are ever required
  • Multiple trim options (Sunset Green Home is using ELEMENT's die-cast seamless aluminum Flanged Bevel trim)
  • Compatibility with several models of Lutron dimmers; Sunset Green Home will use Lutron's dimmers and switches throughout the project

Now that the light fixtures are in, we'll be finishing the fire sprinkler system, installing insulation where appropriate and getting ready to close up the ceilings. Stay tuned for more progress updates over the coming weeks!  


Practical Sustainability: Take Off Your Shoes!

Image courtesy of PANPOTE at FreeDigitalPhotos.net

Image courtesy of PANPOTE at FreeDigitalPhotos.net

This month’s Practical Sustainability column describes how you can save money and improve the healthiness of your home – with zero investment.  All it takes is a willingness to take off your shoes when you come in from outside.

While we occasionally relax our “no shoes inside” habit when we host a dinner party, for our family taking our shoes off before we come inside is the norm.  But what does this have to do with sustainability, you might wonder?  The answer is a whole lot! 

Removing your shoes at the door extends the life of your carpets and floors.  Tiny pebbles between the treads of our sneakers can scratch our wood floors.  And dirt on the bottoms of our loafers will rub off onto our rugs and floors.  By reducing the wear and tear on our floors and carpets, we’re extending their life span – and delaying the time until they need to be recycled or sent to a landfill.

Because our rugs and floors generally stay cleaner if we remove our shoes before entering, we’re spending less time vacuuming and mopping.  We’re using less electricity to run the vacuum, and purchasing fewer cleaning supplies for mopping and stain removal.  While the financial benefits of reduced maintenance might be hard to quantify, we know intuitively that we’re keeping a few dollars in our pockets by having cleaner floors.

Most importantly, by keeping our “outside shoes” beyond the threshold of our home, we are contributing to a healthy indoor environment.  Nine years ago, our dog Ginger came into our lives.  And that was a real eye opener!  I am more aware now of what has been deposited on the city sidewalks just outside our home.  All you need is to experience one case of canine giardia and that’ll have you wiping your dog’s feet every time she comes in from a walk!

If you live in the suburbs, what you track inside on the bottoms of your shoes may be different from the toxins that lurk on city sidewalks, but they’re still potentially harmful.  Pesticides and weed killers can remain on your lawn for up to a week after they are applied.  As you walk across the lawn, your shoes are picking up those toxins.  You may also track pollen and other allergens inside after a walk in the neighborhood.  When you pass through your garage to get into the house, you may pick up oil and other contaminants form the garage floor.

The LEED for Homes green building program awards a point toward certification to projects that “design a shoe removal and storage space near the primary entryway, separated from living areas.”  The area must include seating and storage space for two pairs of shoes for each bedroom in the home.  According to the LEED® for Homes Reference Guide, “debris carried into the house from shoes often contains lead, asbestos, pesticides, and other hazardous materials…One of the most effective approaches to reducing indoor contaminants is removing shoes upon entry.”  Good Morning America found that shoe soles were “dirtier than a toilet seat” in a 2008 study conducted by the ABC News production.

Taking off your shoes at the door is common sense and costs you nothing.  But it could save you time and money on home maintenance, and can lead to a healthier indoor environment.  So what are you waiting for?  Take off your shoes at the door when you get home from work today. 

Now that’s what I call Practical Sustainability!

Get to Know LEED®: Efficient Heating and Air Conditioning Equipment is not Enough! Get the Ducts Done Right.

If you’re considering new heating or air conditioning equipment to improve your home’s
energy efficiency and thermal comfort, you’re taking a step in the right direction. But
unless you get the heating and cooling distribution - meaning the ducts through
which your cool and/or warm air travels - done right, you’re leaving money on the table,
so to speak.

The LEED® for Homes green building program awards a project up to three points for
measures aimed at optimizing the distribution of heating and cooling. And there’s a good
reason to do so. According to the LEED for Homes Reference Guide,

“In typical new homes, duct leakage may account for 15% to 25% of total
heating and cooling energy use. Leaky supply ducts running through
unconditioned spaces may dump conditioned air outside or draw
unconditioned outside air into the home…Reducing the duct leakage rate
saves energy, but more importantly, properly designed and sealed duct
systems deliver air more effectively within the home. Unevenly hot or
cold rooms are often caused by leaky ducts.”

So what is Sunset Green Home doing to ensure occupant comfort and earn points toward
LEED certification? We’re following the LEED for Homes green building program’s
guidelines for duct design and installation.

First, Sunset Green Home is minimizing the number and size of duct runs by installing
Mitsubishi Electric’s Multi-Zone Hyper Heat mini split system for heating and cooling. The
system has a single outside air source heat pump (compressor) connected to five air
handlers, each of which is attached to short duct runs that serve the rooms in the
house. By contrast, duct work for a conventional forced air system might have large
ducts running throughout the home from a single heat or cool air source – making
efficiency losses from the duct work more likely.

Air handler in the background with short duct runs to serve the bedrooms below.

Air handler in the background with short duct runs to serve the bedrooms below.

Second, Sunset Green Home has used industry-approved software to calculate the amount
of air required for each room based on such factors as the size of the room, the number
and size of its windows, and which direction it faces. The ducts have been designed
(sized) to deliver exactly what each room needs based on its unique conditions.

Short duct run sized for required air flow.

Short duct run sized for required air flow.

Third, Flanders Heating & Air Conditioning, Sunset Green Home’s HVAC contractor, has
followed the LEED for Homes program’s guidelines for locating the air handlers and
short ducts runs that will serve each room. Air handlers have been placed inside the
conditioned envelope of the house. Three air handlers are in the attic of the house (which
is insulated at the rafters, and therefore part of the home’s conditioned envelope) and two
are located in closets on the first floor of the home.

Air handler and ducts located in the conditioned attic space.

Air handler and ducts located in the conditioned attic space.

Lastly, Flanders has followed the LEED for Home’s guidelines for duct sealing and
insulation.

  • Sheet metal ducts will have their joints and seams sealed
  • Insulation seams will be sealed with foil tape or duct butter
  • Sheet metal supply ducts will be wrapped with R-6 foil faced fiberglass insulation
  • When installation is complete, all ducts will be sealed to prevent construction dust and debris from entering
Air handler with insulated ducts.

Air handler with insulated ducts.

Flanders is also installing acoustical lining in all sheet metal return ducts. While not
critical to the system's energy efficiency, acoustical lining contributes to occupant
comfort by ensuring that the system operates quietly.

Getting the ductwork right can contribute to a high performing heating and cooling
system. If you're considering installing a new system or upgrading your existing HVAC
system, be sure to discuss the distribution system with your contractor. Limit air leakage
to outside of the conditioned envelope of your home by optimally sealing, insulating and
locating your ductwork.

Practical Sustainability: Swap Out Your Old Inefficient Bathroom Fans

If your home is like mine, it has old bathroom fans that make a terrible racket when turned on.  They may or may not clear the humid air from the room when you shower.  And, in all likelihood, if they’re more than a couple of years old, they use a lot of energy when you run them.

For this month’s Practical Sustainability column, we swapped out all of the bathroom fans in our home – and challenge you to do the same. 

Why do Bathroom Fans Matter Anyway?

Bathroom fans are important for maintaining healthy indoor air quality.  Moisture is a home’s enemy.  Particularly in a bathroom, where the humidity level rises significantly when a shower is in use, excessive moisture can lead to cracking paint, damaged wall board, warped cabinet doors and deterioration of structural framing.  Unchecked humidity provides conditions under which mold, mildew and other bacteria can grow and cause occupant health problems. 

When we think about proper bathroom ventilation, we need to consider how a fan:

  • Protects the structural integrity of a home
  • Promotes healthy indoor air quality
  • Contributes to occupant comfort, and
  • Delivers energy efficiency

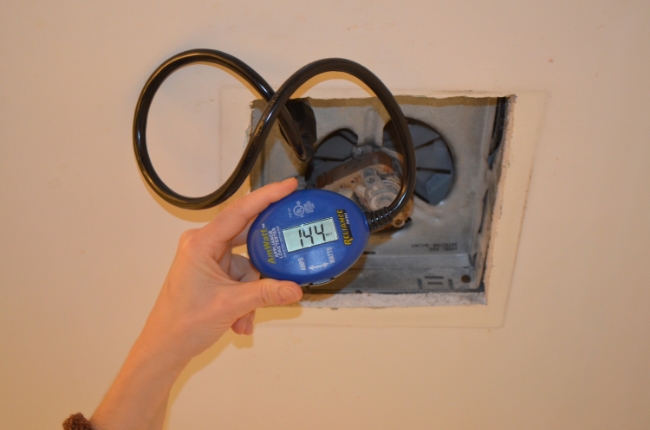
Bathroom fans are specified using several performance measures:

  • Amount of air they move in cubic feet per minute (cfm)
  • Noise level, expressed in sones (a measure of how loud a sound is perceived to be).  The sone scale is linear: four sones is perceived as twice as loud as two sones
  • Energy use (generally expressed in watts, or watts/cfm when comparing models with different fan speeds)

Our Challenge

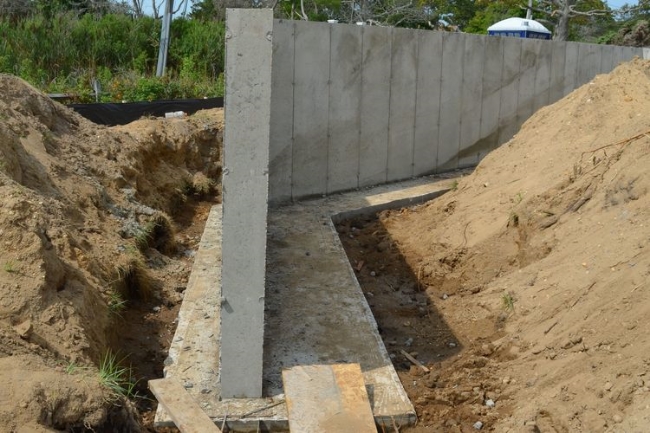
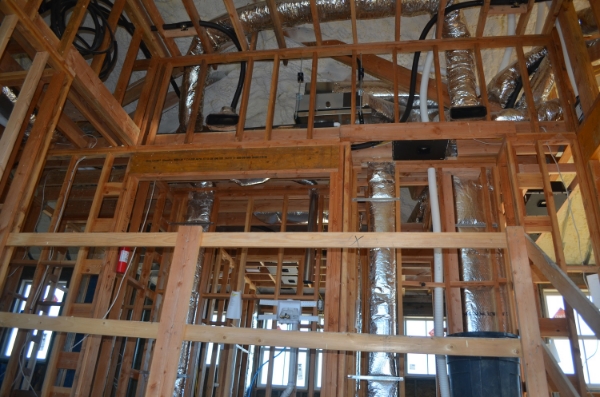
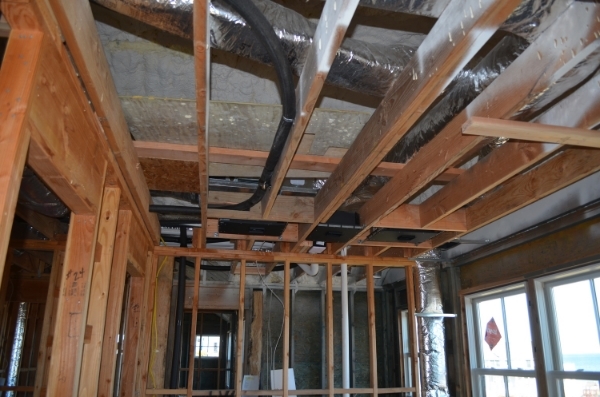
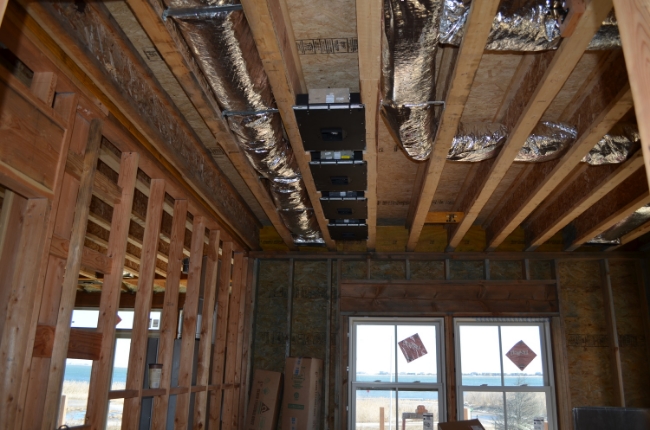
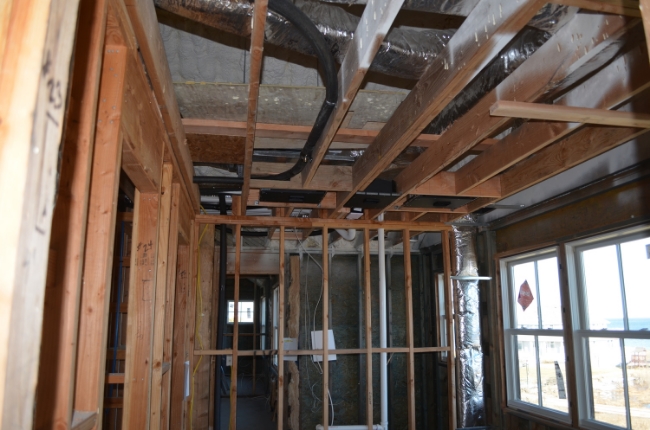
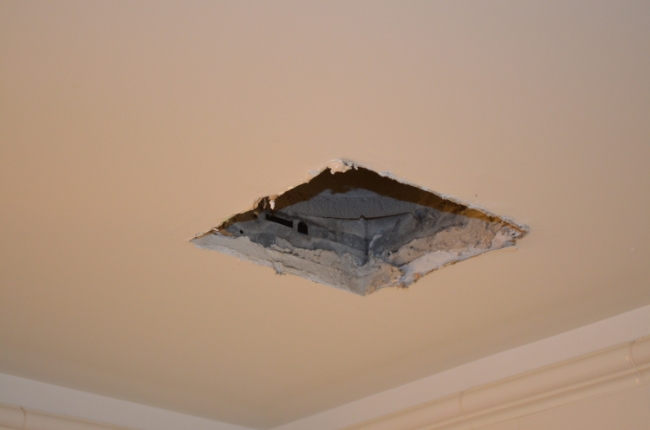
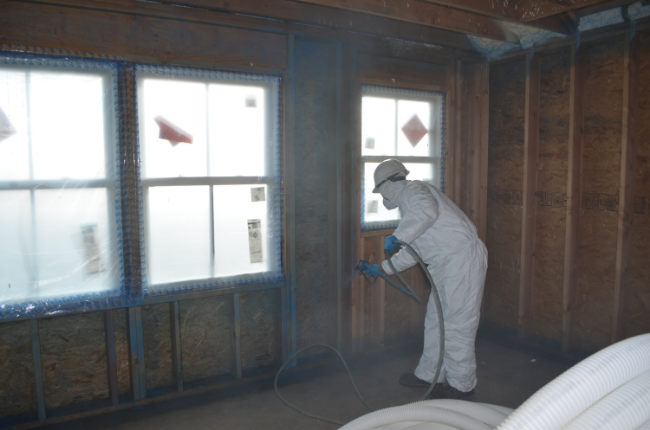
We live in a 100-year-old apartment building where our only access to the bathroom fans is from below the existing ceiling.  When we purchased the apartment 13 years ago, we installed ducts to the outside and added fans to each bathroom.  But the fans were extremely noisy and were energy hogs.  While the fans did a good job of clearing the air during our showers, we had one bathroom in which we experienced some mildew growth on the ceiling.  Our challenge was to replace all of the bathroom fans with quieter models that use less energy.  And, most importantly, we had to complete the retrofit without undertaking a major renovation.  After all, this is Practical Sustainability, and – if you have been following this series – we try to provide practical ideas that don’t require major investment.

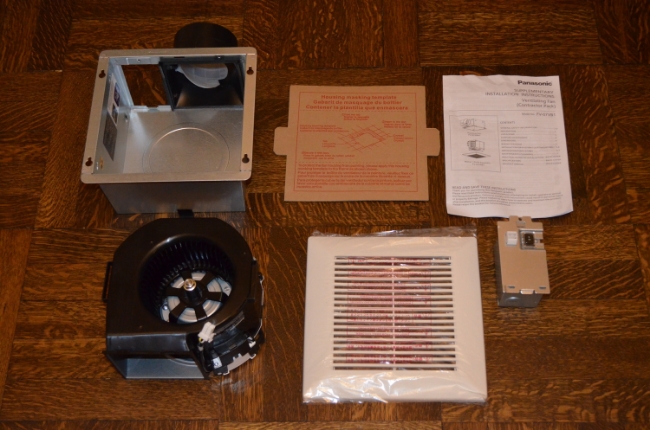
I contacted Broan, Delta and Panasonic, three top manufacturers of bathroom ventilation, and asked each company how we might address our needs.  Each company sent several bathroom fans for me to try out – ranging from their top-of-the-line models to their entry-level models.  Although they make fans of many sizes, each company also sent fans that could use practically the same “footprint” as the fans that we were replacing, just in case we encountered problems in our ceilings that would make it difficult to modify them for a larger fan.

John Hite, the owner of New Jersey based Hite Construction, has been a friend for over 20 years and, when I told him what I planned to do, he offered to send his crew to my apartment to oversee the work.  John does the vast majority of his work in New York City, where there are no quirky conditions he hasn’t yet encountered.  While adding bathroom fans to existing apartments isn’t always possible (some buildings, and occasionally the NYC Landmarks Commission, prohibit making penetrations through building facades), John says that most renovations will include bathroom fans where possible.  The greatest concern he hears from homeowners and design professionals is noise minimization.

Our Results

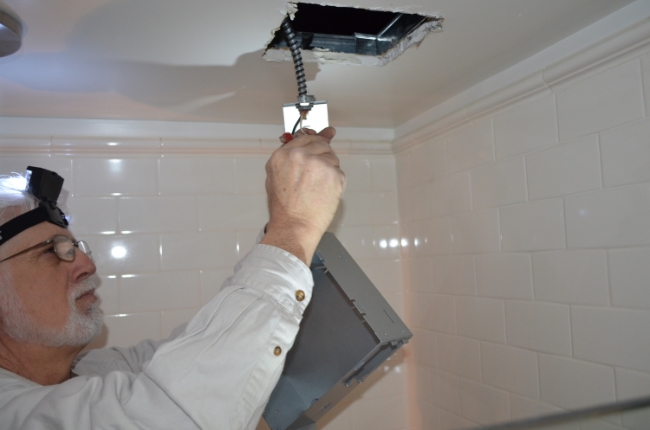
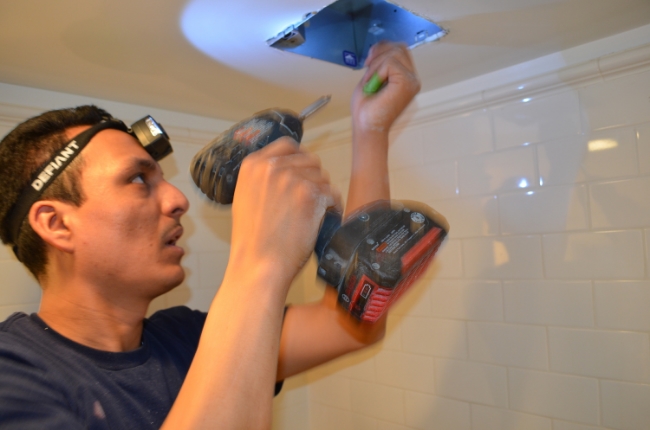
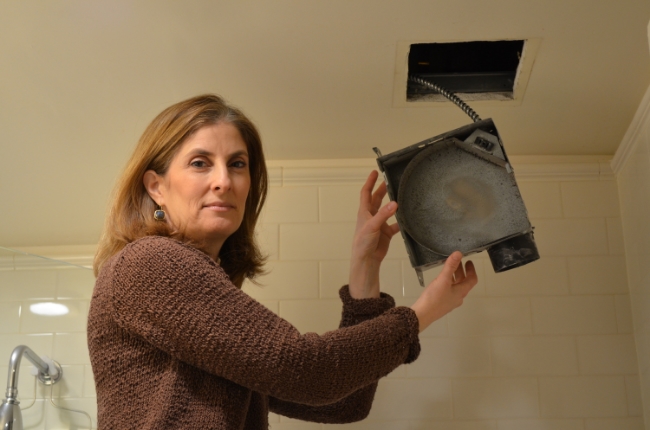
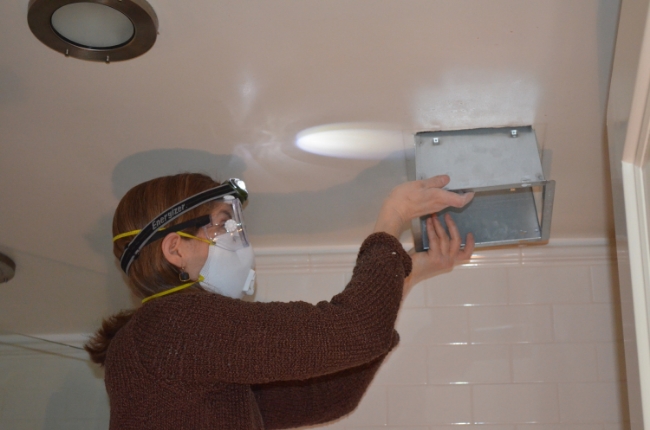
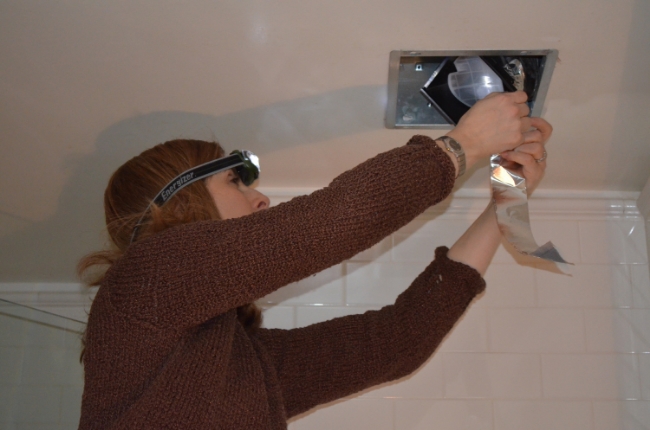
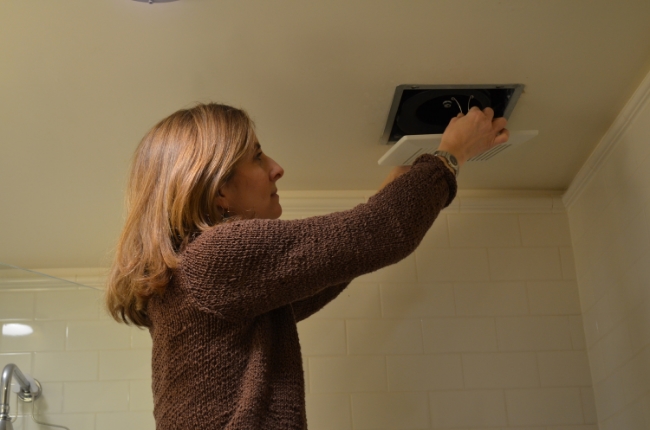
I was very happy to have Isai and Mike from Hite Construction along to help me with the retrofit.  We tried a fan from each of the three manufacturers in each of three bathrooms. Here are the results:

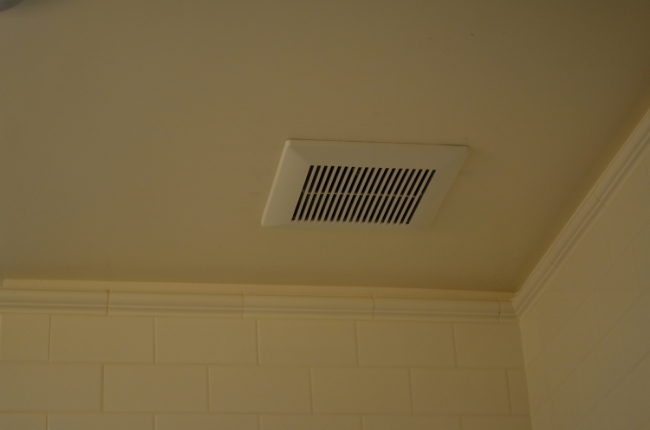
Bathroom #1: Broan Model 690 Bath Fan Upgrade Kit

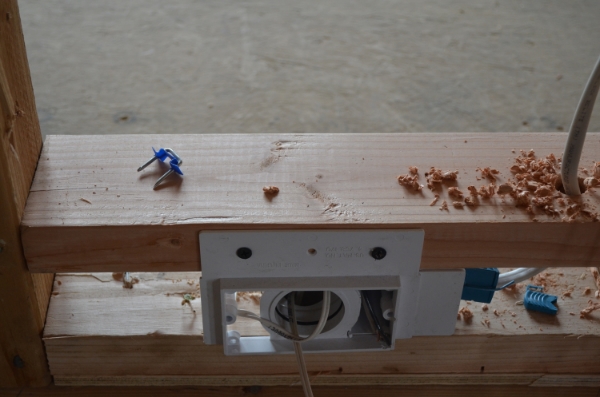
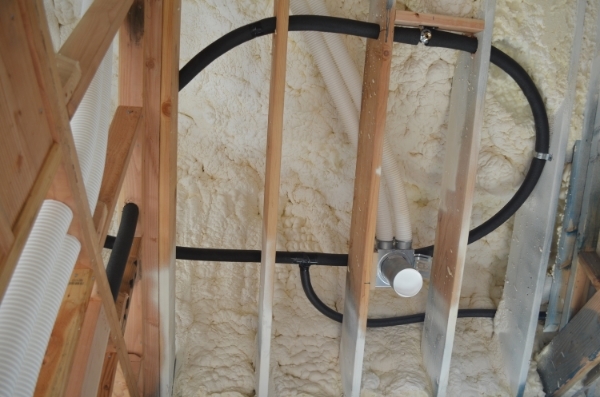
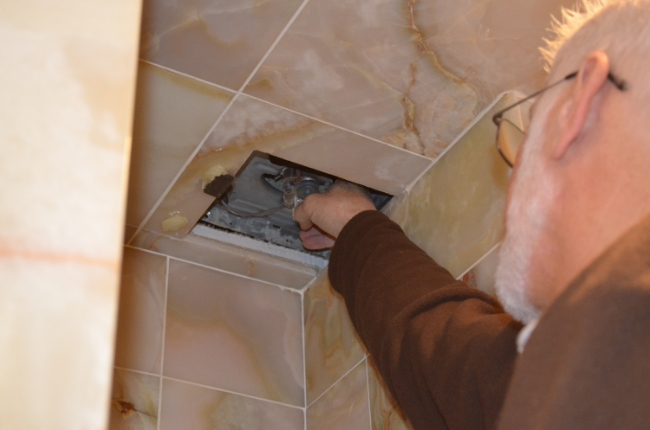
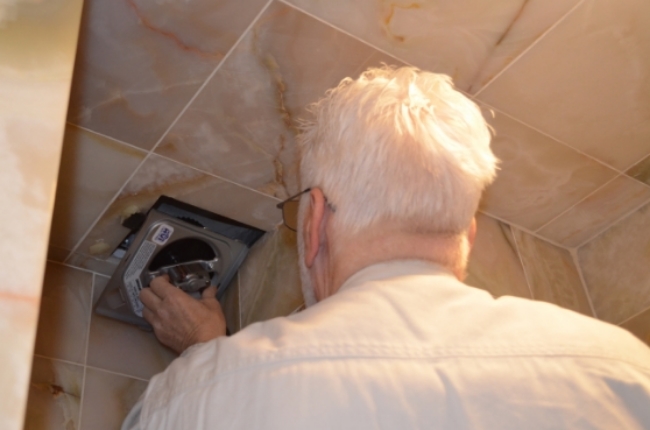
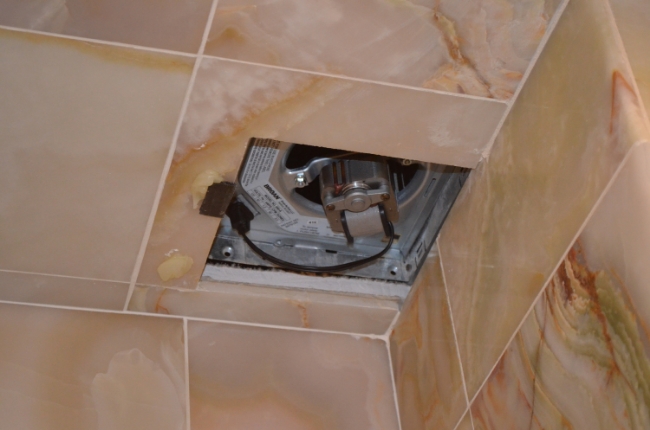
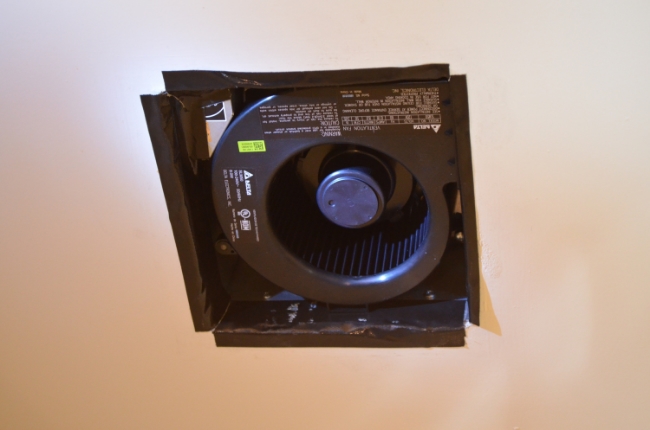
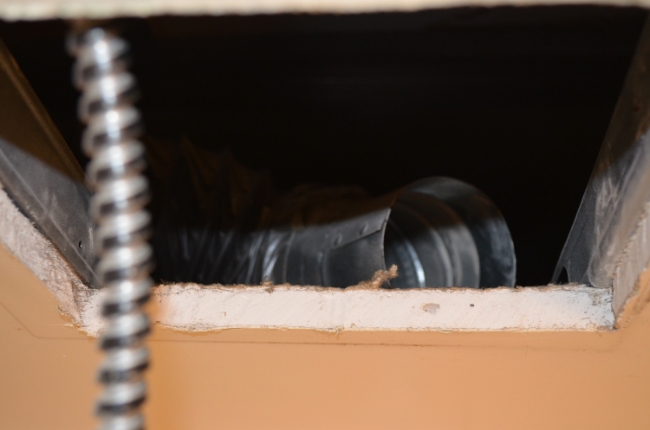
In a 100-year-old building, where you’re accessing everything from below the ceiling, you can’t always choose an ideal placement during construction.  For some reason, our bathroom fan had been installed up against a corner of a niche in the shower.  And the fan was installed before the walls and ceiling were tiled with 12” x 12” marble.  When we investigated replacing the bathroom fan, we discovered that we could not remove the old housing without removing the wall and ceiling tiles from around it – and that was a can of worms we were not willing to open up.

Thankfully, Broan NuTone had included the Model 690 Bath Fan Upgrade Kit with the fans they had sent us.  The 13-year-old fans we were replacing were Broan model 688 fans, which are still manufactured today and are typically used by contractors for their low cost and ease of installation.  But the fans are noisy at 4 sones, and only draw 50cfm.

The upgrade only took five minutes to complete and the result for us was improved performance at 60cfm with a noise level of 3 sones.  In truth, had we not had to keep the old fan housing, we would have used one of the much quieter and more energy efficient fans that Broan offers.  But, we were fortunate that Broan makes an upgrade kit for our old fans, and we are much happier with the reduced noise level and increased air flow inside the shower. 

Bathroom #2: Delta Breez Model SLM50

We removed the grille from the old fan in our sons’ bathroom and discovered that the housing had been plastered into place.  In addition, there were gaps around the fan that meant the fan was drawing not only the air from the bathroom, but also some air from within the ceiling plenum (the space between the structural ceiling and the dropped ceiling of the bathroom). Our hypothesis was that this bathroom had mildew on the ceiling because the fan wasn’t solely removing air from the room itself. 

We had just painted the ceiling in this bathroom and were trying to replace the fan without damaging the ceiling in any way.  Isai carefully chipped away the plaster and then used sheet metal scissors to cut away the old housing, which had been installed between two metal studs in the ceiling and attached with screws that we couldn’t access from below the ceiling (the old fan had been installed before the gypsum ceiling had been put in place). 

With metal studs less than 8 inches apart on two sides of the ceiling, we determined that we would have to use a fan whose housing had the same footprint as the old fan we had just removed.  Delta had sent its BreezSlim Model SLM50, an ENERGY STAR qualified fan with quiet operation at 1.0 sone, and an identical housing size to the one we had just removed. 

As per the instructions for a retrofit installation, we attached the housing itself to the metal studs up inside the ceiling (we used sheet metal screws).  The rest of the installation was easy.  Once the fan’s blower was in place, we used duct tape to seal the edges around the housing so that the fan would only draw air from within the bathroom (as opposed to pulling air from the plenum space as the old fan had been doing). 

The result: a quiet, energy efficient bath fan (rated at 8 watts) drawing air only from inside the bathroom.

Bathroom #3: Panasonic EcoVent Model FV-07VBA1

After having watched Isai and Mike swap out the fan in my sons’ bath, it was time for me to try a retrofit on my own.  I removed the fan from my daughter’s bathroom and found the same metal stud setup that was in place in my sons’ bathroom.  Once again, I’d have to use a fan whose housing would fit between the two metal studs. 

Panasonic had sent its EcoVent fan, whose housing has been designed to make retrofitting from below the ceiling extremely easy.  Moreover, the housing has an innovative flange around its perimeter that creates an air barrier and ensures that air is only drawn from within the bathroom and not from up in the ceiling plenum (we would not need to add duct tape to seal around the edges). 

I had to use a drywall saw to enlarge the opening slightly (the EcoVent is approximately half an inch larger than the old fans I had removed), after which the housing slipped easily into place.  Attaching the vent and junction box was straightforward (it is very important that you turn the electricity off at the circuit breaker before attempting an installation of a bathroom fan or any electrical appliance or equipment!).  In less than an hour, I had installed the bathroom fan, without causing any damage to the ceiling (again, I was hoping not to have to repaint after completing the retrofit).

Because of the size of my daughter’s bathroom, I set the fan at its standard 70cfm speed, but it comes with a booster switch that enables it to operate at 90cfm if needed.  This is particularly useful for homes that must meet stringent ventilation standards required by ENERGY STAR, LEED and other green building programs.

I had used a watt meter to check the electric consumption of the old fan in my daughter’s bathroom and learned that it drew a whopping 144 watts of electricity.  The new Panasonic fan is rated at 20 watts, and has quiet operation of 1.0 sone. 

Lessons Learned

If I can do it, so can you!  Our ceilings were problematic, but we replaced all of the fans without damaging the ceilings in any way.  Each of the three manufacturers had a product that addressed our bathrooms’ unique challenges.  The price tags on the models we used were well below $100 per unit.  And given our usage patterns, with the energy savings of the two ENERGY STAR models that we installed, we predict that the fans would pay for themselves in a short two to three years.  We can’t emphasize enough the intangible benefit of having quiet fans; while we can’t assign economic value to it, occupant comfort is still an important consideration.  We’re confident that the quality of the fans coupled with our airtight installation will result in improved indoor air quality as well.

But That’s a Challenging Retrofit…What Would We Have Done If We Were Unconstrained?

As I mentioned, each of the manufacturers sent a retrofit solution that they felt we could use if we encountered problems in our ceilings (which we did!).  But they also sent multiple models that could be used for new construction or for less constrained retrofits (for example, in a home where the bath fan housings could be accessed from the attic).

So what is the state-of-the-art in bathroom ventilation?  Today’s best bathroom fans are very quiet (<0.3 sones), are extremely energy efficient, and include advanced technologies for sensing humidity or occupancy.  Here are some of the models that we might have used if conditions permitted (in alphabetical order by manufacturer):

  • Broan Ultra Green multi-speed fans.  With virtually silent operation (<0.3 sones), Broan’s Ultra series fans come packed with features.  Users can choose from amongst several fan speeds that can be adjusted according to room size and humidity conditions.  With optional occupancy and humidity sensors, the fans may be set to operate continuously at low levels and then automatically adjust their speed when conditions call for more power.  The fans come with a mounting frame that can be used for retrofit installation in 2x8 framed ceilings. And best of all, these feature-packed fans deliver using <8 watts of electricity.
  • Delta BreezSignature series.  Delta BreezSignature fans also deliver practically silent (<0.3 sones) operation, variable speed controls and optional humidity or motion sensors – all at a very low energy consumption that tops out around 8-10 watts.  Because they’re so quiet, the fans include LED lights to let users know that the fans are operating. 
  • Panasonic WhisperGreen Select fansPanasonic has designed its WhisperGreen Select series with “Plug ‘N Play” modules that allow a single fan to be customized in up to three ways – with a night light, a multi-speed sensor that allows for continuous operation at a lower speed with boosted speed when needed, and either a humidity or a motion sensor.  At 110cfm, the fans use less than 10 watts of electricity.

It's probably worth noting that bathroom fans now come with "bells and whistles" that don't impact air quality or energy efficiency - but that some users may want to consider nonetheless.  Most of the fans that I mentioned can be purchased with LED lighting modules for bathrooms where the fan needs to double as the room's light source.  And for music fans, Broan now offers its Sensonic fan, complete with high-fidelity speakers that can pair with most Bluetooth enabled devices.  

So consider swapping out your old, noisy, inefficient bathroom fans.  With great fans like these on the market, you can’t go wrong selecting from any of the three major brands!

Now that's what I call Practical Sustainability!


Dispatch from Design and Construction Week, Las Vegas

The second annual Las Vegas Design and Construction Week took place in mid-January, with thousands of exhibitors and tens of thousands of participants flocking to Sin City for five interrelated trade shows: the 2015 NAHB International Builders' Show (IBS), the Kitchen and Bath Industry Show (KBIS), Las Vegas Market, The International Surfaces Event (TISE), and the International Window Coverings Expo. 

Exhibitors from all corners of the design and construction industries showed off their new product releases.  Home automation products that can be monitored or controlled by smart phone featured prominently, as did retrofit products that enable consumers to capture energy, water and other resource savings without undertaking a complete home remodel.  We also saw innovative new products that promise to reduce construction time and cost, and deliver a tighter, more energy efficient building envelope.

Here's a sampling of what was new and exciting at IBS and KBIS last month:

Broan debuted its new Sensonic bathroom fan at IBS, which delivers high quality audio inside a quiet ENERGY STAR bathroom fan, wirelessly controlled through a Bluetooth-enabled device.  A retrofit kit is available for music fans who already own a Broan QT Series fan.

Broan's Sensonic bathroom fan plays audio from any connected Bluetooth device.

Broan's Sensonic bathroom fan plays audio from any connected Bluetooth device.

The "connected home" was a prominent theme at KBIS as well.  Dacor showed its new Discovery IQ range and ovens, which consumers can control using a smart phone or wireless device.  Imagine preheating the oven on your commute home from work, or setting the appliance to send an alert to your smart phone when its integrated meat thermometer determines that dinner is ready! 

Dacor's Discovery IQ range can be accessed remotely and includes the convenience of pre-programmed recipes.&nbsp;

Dacor's Discovery IQ range can be accessed remotely and includes the convenience of pre-programmed recipes. 

To celebrate its 50th anniversary, Dacor launched an additional innovative upgrade to its appliance lineup.  Using its new DacorMatch system, the company will create custom colored appliances from a paint chip, fabric swatch or Pantone color code.

The DacorMatch system creates custom-colored appliances from pantone colors or paint swatches.

The DacorMatch system creates custom-colored appliances from pantone colors or paint swatches.

The show had no shortage of products for retrofit applications, many of which can be installed by experienced do-it-yourselfers.  Taco, a leading manufacturer of hot water plumbing products, launched its Hot-Link System at IBS.  With a simple valve installed underneath a sink and the Hot-Link circulator pump installed at the hot water tank, retrofitters can have instant hot water and capture the water-saving advantages of a structured plumbing system without undertaking a major renovation.

Taco's Hot-Link System gives homeowners the benefits of a structured plumbing system without the need for a major renovation.

Taco's Hot-Link System gives homeowners the benefits of a structured plumbing system without the need for a major renovation.

Reengineered to comply with ENERGY STAR's upcoming greater energy efficiency requirement, Panasonic revamped its WhisperFit remodeler bathroom fan with several additional features that will make it more flexible (e.g., variable fan speed controls) and easier for a do-it-yourselfer to install when it becomes available this year (including a simplified three-step process using its Flex-Z Fast bracket, which makes it easy to install the fan from below an existing ceiling). 

Panasonic's redesigned WhisperFit fan uses a simple three-step process to replace a bathroom fan from below the ceiling.

Panasonic's redesigned WhisperFit fan uses a simple three-step process to replace a bathroom fan from below the ceiling.

CertainTeed Insulation has a new open cell spray foam insulation, CertaSpray X, with an integrated ignition barrier.  Applied in a single step process, CertaSpray facilitates an airtight building envelope in less time and at a lower cost.

CertaSpray X spray foam insulation with integrated ignition barrier uses a single step application process to&nbsp;save&nbsp;time and cost.

CertaSpray X spray foam insulation with integrated ignition barrier uses a single step application process to save time and cost.

Huber Engineered Woods has its own new product launch intended to create an air tight and water tight building envelope.  Unveiled at IBS, flexible ZIP System Stretch Tape makes it easy to air seal around curves and other tight spots where flashing is required.

ZIP System Stretch Tape creates an airtight and water tight seal around curves and other hard-to-reach areas.

ZIP System Stretch Tape creates an airtight and water tight seal around curves and other hard-to-reach areas.

We saw many other interesting products make their debut at IBS/KBIS.  There's seems to be no shortage of innovation in the design and building industry!

Taking Stock: How a Year of Sustainable Changes Improved Our Bottom Line

In 2014, I set out to make some changes that would reduce our family’s impact on the environment and – hopefully – result in some financial benefits as well.  During the year, we took the following actions:

  • Replaced about 60% of the light bulbs in our home with LED bulbs
  • Swapped out our 2.5 gallons per minute (gpm) shower heads for 20% more efficient WaterSense fixtures (with a flow rate of 2.0 gpm)
  • Drastically reduced our use of the clothes dryer (which we now use only for towels and post-vacation laundry pileups)
  • Cleaned all of the filters and coils in our air conditioning and refrigeration equipment
  • Changed to green cleaning products that received an “A” rating from the Environmental Working Group (replacing several products that received a grade of “F”)
  • Took steps to reduce the number of catalogs and direct mail solicitations received by our household
  • Recycled our electronic waste (which included about 20 old cell phones that had been accumulating in random drawers throughout our home)

I can’t quantify all of the financial benefits of having made these changes.  We live in an apartment building and don’t have separate metering for water use.  And the economic benefit of eliminating catalogs doesn’t accrue to us.  Still, I’ve been curious about how some of these changes have affected our utility bill.  So I pulled out three years of gas and electric bills to see if there have been any measurable changes. 

To establish a baseline and to identify any “outliers,” I reviewed our utility bills over a two year period prior to having started my “Practical Sustainability” campaign.  The chart below shows our household’s monthly electric use in kilowatt hours (kWh) over the three year period from 2012 – 2014. 

We expected to see some decrease in usage as one of our children moved away to start college in September 2012, and an increase when another one of our children graduated college and moved back home this summer.  We also identified a significant efficiency loss (i.e., a spike in usage) in the summer of 2013.  Our central air conditioning failed because the exterior air intake had become clogged with dryer lint – which forced the A/C unit to work harder to try to draw air inside. Note: do not locate dryer vents near A/C intakes (we had no choice, as we live in a 100+ year old apartment building)! 

What is important to note is the steady improvement in our electric usage following each of the “Practical Sustainability” actions we implemented in 2014.  The chart below shows the same data in another format, which allows for a year-over-year comparison of monthly electrical usage.  For every month, our 2014 usage is below – and in some cases significantly below – the same month’s usage in 2012 and 2013, despite the fact that we have more people living at home in 2014 than we did in 2012. For example, in late February 2014 and through March, we changed our light bulbs from incandescent and halogen to LED.  Our electric use following those actions declined significantly.  Despite the increase in our household’s size in late summer 2014, we have kept our electric usage lower than the prior years' baselines.

I also evaluated the per kilowatt cost of electricity.  We live in New York, where the 2013 cost per kilowatt-hour of residential electricity was second only to Hawaii.  The chart below shows a steady increase in our unit cost of electricity (I included all taxes and access fees from my electric bill).  If we hadn’t made any changes in usage, we would have seen our electric bill increase by 10% simply as a result of climbing utility rates. 

But the chart below summarizes the value of the changes we made this year.  By decreasing our electricity usage, we lowered our electric bill by over $1,100 in 2014 despite the 10% rate increase.  How did we do it?  By decreasing our usage by 34% from 2013 to 2014. 

We’re happy to have kept $1,100 in our pockets this year.  But we don’t want to lose sight of the environmental impact of our actions.  By reducing our electricity consumption by over 5,100 kWh, we kept nearly 4 tons of carbon dioxide out of the environment, according to the US EPA’s Greenhouse Gas Equivalencies Calculator.  And that’s equivalent to the annual greenhouse gas emissions of 8,375 miles driven by an average passenger vehicle or 1.3 tons of waste sent to the landfill.   

Keep an eye out for more Practical Sustainability columns on SunsetGreenHome.com this year.  For this month’s column, we’re getting ready to replace several 13-year-old bath fans.  Bath ventilation technology has come a long way in the past decade, and I am certain we’ll see another drop in our electric bill…

Now that’s Practical Sustainability! 

Practical Sustainability: Get Smart About Your Thermostat!

School’s out for Winter Break.  The holiday season is in full swing.  And, like many, you may be heading south for a touch of sunshine.  Or north to find a “White Christmas.” Or away to visit family in another part of the country.  When you’re making a pre-travel vacation "to do" list, make sure to include “Change the Thermostat” as one of your entries. 

According to the US Department of Energy, “heating and cooling account for about 48% of the energy use in a typical U.S. home, making it the largest energy expense for most homes.”  Not only does heating and cooling impact your wallet, but it also takes a toll on the environment in the form of excess electricity that needs to be generated and additional carbon-emitting fossil fuels that are burned to generate the warm or cool air.

Smart or programmable thermostats are everywhere these days.  Standard features include the ability to handle multiple settings per day and special schedules for weekends or vacation times.  Many will let you monitor and change your home’s temperature from your smart phone.  Some, like the Nest Learning Thermostat, are even smart enough to learn your habits when you don’t have time or inclination to set up a program.

By using a smart, programmable thermostat, you may be able to save 10% - 20% on your heating and cooling bills (savings calculators abound on the Internet - just search "programmable thermostat energy savings calculator" and have your utility bill handy so you can enter your fuel costs into the calculator). 

Many of us remember the old TV announcers imploring “don’t touch that dial!”…well this time, I say go ahead and “touch that dial.”  Set your thermostat to turn down the heat when you sleep or when you are away at work.  If you live in an air conditioning climate, do the opposite. 

And, this holiday season, remember to change the thermostat when you leave your home on vacation.  You’ll see a difference in your bottom line and make a difference for our planet.

Happy New Year and safe travels from Sunset Green Home!

Progress Update: A Flurry of Activity to Finish the Year

While a lot of businesses are slowing down for the holidays, work at Sunset Green Home is in full swing.  I arrived for my weekly site visit to find the roofers from J.P. Hunter working on the pool house's ATAS standing seam aluminum roof.    

Pool House Roofing 1

By the time I left in the afternoon, they had completed the cupola and a section of the main part of the roof.  Several people on the J.P. Hunter crew were installing shingles on the main house.

Pool House Atas Roof

Chris Mensch's crew from Coastal Management were busy on the south side of the pool house installing the horizontal cedar boards that will enclose the piling area underneath the structure.

Pool House Lattice

Inside, the crew from Cary Insulation were spraying FortiCel, a protective coating by CertainTeed Insulation that inhibits the growth of mold on structural framing members.  

Applying FortiCel

The attic had been sprayed with open cell polyurethane foam the previous week, so Flanders Heating & Air Conditioning was able to start the HVAC installation by setting in place several of Sunset Green Home's Mitsubishi Electric Multi-Zone Hyper Heat system air handlers.

Mitsubishi Electric Air Handler

Flanders has also started to install the project's Zehnder ComfoAir 550 ERV system, by running individual ComfoTube flexible air distribution pipes from the ERV unit to each room that will be served by it.

Zehnder ComfoTube

The interior space is starting to shape up.  Here we can see:

  • Blue FortiCel on the exterior framing and sheathing
  • Open cell spray foam insulation in the roof, which will receive an "ignition barrier" in the attic and will be covered by CertainTeed AirRenew gypsum in the living space and cathedral ceilings of the bedrooms below
  • ComfoTube piping leading from the ERV to each of the bathrooms and bedrooms on the second floor of the house 

As 2014 comes to a close, we thank the terrific crews who have helped Sunset Green Home take shape this year.  We've come a long way since March, when Details, a division of non-profit Humanim, "deconstructed" (click here to watch the video) the home that Sunset Green Home replaces, and which was made uninhabitable by Hurricane Sandy two years ago.  

How are Your Walls Performing?

What Makes a High Performance Wood-Framed Wall for Sunset Green Home?

21st century building scientists have developed new technologies to ensure that wall assemblies control rain, air, water vapor and heat, which makes new homes today more airtight and watertight than ever.  And tighter building envelopes can lead to healthier and more energy efficient homes.  With a goal of LEED Platinum certification, Sunset Green Home needs to have a high performance wall assembly.  Here’s a look – from the outside in – at Sunset Green Home’s exterior wood-framed walls.

 Cladding

Exterior cladding is a home’s first line of defense.  The best performing cladding is designed to resist wind and water, and is made of renewable or recyclable resources.  Sunset Green Home has purchased G&R “Choice Brand” #1 R&R (rejointed and rebutted) Western Red Cedar wood shingles from Liberty Cedar for their high quality and consistency with the historic shingle-style homes in the region.  Proper installation is critical to prevent moisture from penetrating the walls. 

Partial installation of Sunset Green Home's Certi-grade Western Red Cedar shingles from Liberty Cedar

Partial installation of Sunset Green Home's Certi-grade Western Red Cedar shingles from Liberty Cedar

Drainage Plane and Rigid Sheathing

Even the best cladding is vulnerable to water intrusion, so building scientists recommend including a drainage plane (also known as a water resistive barrier, or WRB) behind the cladding.  Behind the WRB, a layer of rigid sheathing provides structural integrity for wind-resistant building.  Traditional wood frame construction typically includes a sheathing layer of plywood or oriented strand board (OSB).  Experts recommend sheathing of at least ½” thickness to protect the building envelope from damage by wind-borne debris in a severe storm.  Sunset Green Home is using ½” ZIP System sheathing from Huber Engineered Woods, which includes a WRB integrated into the structural sheathing.  When sealed with ZIP Flashing Tape, the assembly is water-tight and airtight.

Sunset Green Home's 1/2" ZIP System sheathing with integrated water resistive barrier

Sunset Green Home's 1/2" ZIP System sheathing with integrated water resistive barrier

Advanced Framing Techniques

It is difficult to meet the insulation requirements of increasingly stringent energy codes using conventional 2x4 framing.  High performance wood framed wall assemblies like the one found in Sunset Green Home use at least 2x6 framing.  Sunset Green Home has also used material efficient framing techniques, such as ladder blocking where interior and exterior walls intersect, to allow for greater insulation to be placed in the walls.

2x6 framing with ladder blocking at the intersection of Sunset Green Home's interior and exterior walls

2x6 framing with ladder blocking at the intersection of Sunset Green Home's interior and exterior walls

Mold Inhibitor

Sunset Green Home has included a protective mildewcide coating to inhibit mold growth inside the walls.  Cary Insulation has applied CertainTeed’s proprietary FortiCel™ product, a mold inhibitor that is sprayed onto the interior wall cavity after framing and sheathing is complete and before insulation is installed, to prevent mold growth on structural framing surfaces. 

CertainTeed's FortiCel protective mildewcide on Sunset Green Home's interior framing

CertainTeed's FortiCel protective mildewcide on Sunset Green Home's interior framing

Insulation and Smart Vapor Retarder

Insulation minimizes heat transfer through the wall assembly and contributes to a home’s energy efficiency.  A high performance wall assembly will include high R-value wall insulation to meet the home’s energy efficiency goals.  However, while insulation will reduce heat transfer through walls, it cannot prevent mildew-causing moisture from moving through a wall assembly.  21st century building science has given birth to smart vapor retarders that allow a wall cavity to dry out under humid conditions and deter moisture from moving into the walls under dry interior conditions.

Sunset Green Home’s walls will be insulated to R-21 with CertainTeed’s innovative SMARTBATT™ insulation, which combines insulation with a smart vapor barrier in a single kraft-faced fiberglass batt product and eliminates the need for installation of separate insulation and vapor barrier products.  By blocking moisture from entering the wall cavity when humidity is low and allowing the wall to breathe when humidity is high, SMARTBATT helps reduce the potential for mold and mildew growth.   

CertainTeed's SMARTBATT with smart vapor retarder will be installed to R-21 in Sunset Green Home's exterior walls (photo courtesy of CertainTeed)

CertainTeed's SMARTBATT with smart vapor retarder will be installed to R-21 in Sunset Green Home's exterior walls (photo courtesy of CertainTeed)

Gypsum

Gypsum board is interior sheathing that acts as a fire-resistive barrier and encloses the home’s framing and insulation.  Specialty gypsum products have been designed to reduce noise transmission, fight mold and mildew, and withstand abuse in high traffic areas.  And, a high performance wall assembly can even actively contribute to healthy indoor air quality.  Sunset Green Home has selected one of the most innovative gypsum products available.  AirRenew by CertainTeed uses a patent-pending, independently tested, technology to clean the air by absorbing Volatile Organic Compounds (VOCs) such as formaldehyde that may be present in other building materials or home furnishings.

Sunset Green Home will use CertainTeed's AirRenew gypsum throughout the project (graphic courtesy of CertainTeed)

Sunset Green Home will use CertainTeed's AirRenew gypsum throughout the project (graphic courtesy of CertainTeed)

Low/No VOC Paint

Paint is Sunset Green Home’s final line of defense in its high-performance wall system.  Earlier generations contained VOC-emitting solvents with associated health risks.  All major brands now offer GREENGUARD certified low/no VOC interior latex paints.  Sherwin-Williams’ Harmony paint with Formaldehyde Reducing Technology may even reduce VOCs from other sources in the air.  In spaces where Sunset Green Home doesn’t have AirRenew gypsum, formaldehyde reducing paint could be a helpful final layer.  And choosing paint with integrated mildewcide will complete the high performance wall assembly in Sunset Green Home’s bathrooms and laundry rooms.

If you're renovating or building a new home, make sure you understand what's in your walls!  Harness 21st century building science to include a high performance wall assembly.  Want to learn more?  Check out the slide show we wrote for bobvila.com: What Makes the Ultimate Wall?

We're Freezing! So Let's See if a Window Checkup Can Help

We live in a 100-year-old apartment building whose exterior envelope hasn't been upgraded, so thermal comfort isn't one of the building's strong points.  Heat is delivered through giant clanking radiators that are oversized for the rooms, so most of the winter we need to crack open a window in order to get the temperature down to something comfortable.

Except in the Master Bedroom. Where. We. Are. FREEZING.  All winter long.  For the past 12 years.  So this is the year that I'm systematically reviewing the perimeter of our master bedroom to try to figure out how to warm things up a bit.  What better place to start than the windows, where our lower sash seemed to be slightly out of alignment, causing a gap between the sash and the window frame, and resulting in a noticeable draft along the side of the lower sash.

I called my friend Bob Murray, Regional Sales Manager at Super Enterprises - distributor of Marvin Window & Door Products on Long Island - and asked for his advice.  He set up an appointment for his colleague Ron, Super Enterprises' Field Manager, to come and take a look.  Here's what I learned during our window checkup...

Our windows were manufactured and installed in 2003.  They are Marvin MTO clad ultimate double hung (CUDH) windows, Marvin's most popular window.  They are generally in good condition.  However, while the windows are double-pane with insulating glass, they do not have a "low-e" coating - an optional feature that improves the insulating value of a window while also reducing the amount of the sun's heat that is admitted into the room.  The insulating property of a window is expressed by its U-factor - and the lower the number, the better it insulates.  But Ron says that the higher U-factor of our clear glass (absent the low-e coating) windows isn't the main reason why we're chilly in the winter in our master bedroom.  He did, however, find - and fix! - a number of other issues with our windows.

One of the great features of these windows, which is particularly helpful in a sooty urban environment, is the ability to tilt the sashes into the room to clean them.  We clean our windows two or three times each year.  But it turns out that we haven't been careful enough when using the tilt mechanism to clean the windows - so we created two problems that Ron and his colleague, Emil, were able to repair. 

First, because we hadn't lifted the lower sash up enough before tilting it in for cleaning, we managed to disengage the lower sash from its clutch...a part of the balance tube mechanism that sits on the side of the frame and enables the sash to go up and down.  Ron felt that, after re-seating the window sash into its clutch, the sash was sitting a little straighter - which could help with the draftiness of the window.

Another result of our tilting the window in the wrong position during cleaning was a bent pivot pin on the side of the sash.  The pivot pin enables the sash to tilt and engages the mechanisms on the side of the window so the window can go up and down. Ron changed out the pivot pins on the master bedroom windows and several others that were also damaged.

Bent pivot pin on the side of the window sash...

Bent pivot pin on the side of the window sash...

...replaced with a new - straight - pivot pin.

...replaced with a new - straight - pivot pin.

With the windows open, Ron pointed out another window maintenance issue that we needed to address.  Our outside sill had accumulated a fine layer of soot, which is not uncommon in Manhattan.  Ron recommends cleaning the exterior sills regularly (four times/year) to prevent the soot from getting into the working mechanics of the window.  After cleaning the sill, he sprayed a little bit of silicone onto a rag and cleaned all of "the vinyls" on the windows - the weatherstripping, the outer ledge, and the channels inside the window.  Seasonally lubricating and cleaning the windows is imperative in urban and coastal environments.

Soot on the exterior sill of the window...

Soot on the exterior sill of the window...

...clean sill and window channels keeps the window operating smoothly.

...clean sill and window channels keeps the window operating smoothly.

As for the cold air leaking through the side of the windows?  Ron examined our window's weatherstripping to see if a repair was needed.  The weatherstripping was in excellent condition.    But, he had one more "trick" to address the draft.  He pulled the frame weatherstrip out of its channel ever so slightly, so more surface area would make contact with the sash.

I was hopeful that all I needed was a window tune-up to fix the thermal discomfort problem in our master bedroom.  But Ron correctly pointed out that our master bedroom is on the corner of our building, where there are three exterior walls.  And the architect who designed our original renovation had replaced the room's large radiator with a slim one, which is probably undersized for the space.  I'll address these issues in subsequent posts...but for now - thanks to Super Enterprises - our windows are in great working condition, we know how to maintain them, and we're hopeful that when the really cold weather comes, we will have eliminated the draft alongside the window sash.

Get to Know LEED: The Bathrooms Are Gorgeous…But That’s Not the Point!

Sunset Green Home’s bathrooms will be beautiful.  Each bath will feature Duravit’s Vero bath furniture series, which was awarded a 2014 Iconic Award from the German Design Council.  Axor/Hansgrohe, the manufacturer of Sunset Green Home’s faucets and shower products, took home the “Best of the Best” 2014 Interior Innovation Award.  But in a home that hopes to achieve LEED Platinum certification, beautiful baths are nice to have, but that’s not the point.

Duravit's Vero vanity and washbasin.&nbsp; Image courtesy of Duravit.

Duravit's Vero vanity and washbasin.  Image courtesy of Duravit.

Sunset Green Home hopes to earn five out of six available points for Indoor Water Use in the LEED for Homes rating system’s Water Efficiency category.  And that’s where both Duravit and Axor/Hansgrohe will make real measurable contributions.

Toilets

To earn two points for water efficiency, a project’s toilets must have a flow rate of less than 1.1 gallons per flush (gpf).  According to the LEED for Homes Reference Guide, high efficiency toilets (HETs) achieve their flow targets “by employing improved hydraulic designs, improved technologies, better valving, and in some cases smaller tanks.”  Not all low flush products can deliver high performance, so the US EPA has created the WaterSense program to certify products that deliver at least 20% greater efficiency without sacrificing performance.

Sunset Green Home has chosen Duravit’s WaterSense dual flush Durastyle toilet.  A high efficiency toilet, the Durastyle toilet uses 0.8 gpf for liquid waste and 1.6 gpf for solid waste.  Using the LEED green building program’s weighted average flow rate calculations, the Durastyle HET toilet comes in at 1.07 gpf – which will allow Sunset Green Home to capture the maximum Water Efficiency: Indoor Water Use points available for the project’s toilets.

Duravit's Durastyle dual-flush toilet.&nbsp; Image courtesy of Duravit.

Duravit's Durastyle dual-flush toilet.  Image courtesy of Duravit.

Faucets

Faucets and showers are measured by their flow rates in gallons per minute (gpm).  According to the US EPA, “If every home in the United States replaced existing faucets and aerators with WaterSense labeled models, we could save nearly $1.2 billion in water and energy costs and 64 billion gallons of water across the country annually - equivalent to the annual household water needs of more than 680,000 American homes.”

To earn two points for faucets, Sunset Green Home must install faucets with flow rates no greater than 1.5 gpm.  All of Axor and Hansgrohe faucets include the company’s EcoRight technology, which limits their flows rates to 1.5 gpm, without any sacrifice in performance, and allows them to earn the EPA’s WaterSense label.  Using Axor and Hansgrohe's design-forward faucets not only contributes to beautiful bathrooms, but permits Sunset Green Home to capture the maximum two points available in the Water Efficiency: Indoor Water Use category for faucets. 

Hansgrohe's PuraVida faucet.&nbsp; Image courtesy of Hansgrohe.

Hansgrohe's PuraVida faucet.  Image courtesy of Hansgrohe.

Showers

The final Water Efficiency: Indoor Water Use category addresses the flow rate of showers, which must be less than or equal to 2.0 gpm per stall to earn one point and 1.75 gpm per stall to earn the maximum of two points.  Sunset Green Home has selected a variety of showerheads and hand showers with flow rates of 2.0 gpm and 1.75 gpm.  With these WaterSense shower fittings, Sunset Green Home will earn one of two possible points in the shower category.

Hansgrohe's Raindance S150 AIR Green showerhead.&nbsp; Image courtesy of Hansgrohe.

Hansgrohe's Raindance S150 AIR Green showerhead.  Image courtesy of Hansgrohe.

Most people who visit Sunset Green Home (sign up for our newsletter to learn when we will be offering house tours) will remark on the aesthetics of the home’s bathrooms.  After all, they will be outfitted with furniture, sanitary ceramics, fixtures and fittings that have won a host of design awards. 

But we know what really matters is that the bathrooms are saving water with each gorgeous rinse and flush!

Practical Sustainability: Recycle Your e-Waste

Both of our printers died recently.  Our workhorse laser printer, which started the 21st century on my desk, finally gave up the ghost, as did my multifunction inkjet printer.  When I crawled under the desk to unplug everything, I rediscovered an old desktop computer that I had decommissioned earlier this year.  And when I opened the “computer stuff” box to put away the cables, I found a couple of old cell phones and their chargers. 

If you’re like me, you know you shouldn’t throw old electronics away in your garbage (in fact, more than half of the 50 states have e-waste recycling laws), but if you don’t know what to do with the products at the end of their lives, you end up with a junkyard of old equipment cluttering your closets and drawers.  By the time we scoured our home for e-waste, we had amassed a carload of computer equipment, empty toner cartridges, cell phones and cables.

Our e-Waste
More e-Waste

When cell phones, computer monitors and other e-waste are discarded into landfills, they risk contaminating soil and groundwater with lead, bromine, mercury, arsenic, cadmium and other toxic chemicals.  And because of rapid obsolescence, the amount of e-waste our society generates is accelerating.  In “Electronic Waste Management Approaches: An Overview” published in the scholarly journal Waste Management, the authors, Kiddee, Naidu and Wong cite proper collection and recycling of e-waste as one of several strategies that are key to successful e-waste management.

So, with this in mind, I set off last weekend to find a place to properly dispose of my trove of obsolete electronics.  My daughter, my nephew and I loaded up the car and made our way across the Brooklyn Bridge to the Gowanus E-waste Warehouse run by the Lower East Side Ecology Center.

Brooklyn Bridge

The Gowanus E-waste Warehouse is a vast warehouse filled with unwanted electronic equipment. 

Gowanus e-Waste Warehouse

New electronics, like overstocked chargers still in their packaging, are sold in the warehouse store, as are movies, video games and refurbished electronics.

“Vintage” pieces are cataloged and held in an area where they can be rented as props for movie or theater productions. 

Decommissioned computers and phones are boxed or shrink-wrapped on pallets and sent off-site for recycling. 

The Lower East Side Ecology Center guarantees data security regardless of whether the donated equipment is recycled or reused.

The Ecology Center’s electronic waste program has been operating since 2003.  The organization explains, “According to the E.P.A., electronic waste contributes 70% of the toxins found in landfills, while only contributing 1% of the volume of materials in landfills…Recycling your electronic waste decreases energy and water use, reduces pollution, and keeps hazardous chemicals out of our air and water. Reusing unwanted electronics offers even bigger environmental benefits along with social benefits: creating local jobs and making technology accessible to people who might not be able to purchase new computers.”

DSC_0274.JPG

If you reside in the New York City area, consider dropping off your e-waste at the Gowanus warehouse.  If that’s not convenient, the program offers events throughout the city.  Click here to see the Lower East Side Ecology Center’s Event Calendar (or here to learn about the 12th annual “After the Holidays” E-Waste Collection Series).  And if you live elsewhere in the country, check out the US EPA’s eCycling web resources to learn about regional and state ecycling programs near you.

As you gear up for Thanksgiving, consider gathering up all of your electronic waste and taking it to a recycling center.  Or, if you have children, ask their school’s sustainability club or department to host a school-wide e-waste recycling drive. 

Let’s give thanks to our planet by keeping these materials out of the waste stream!

Where Does Your Fresh Air Come From?

This week’s post is going to be a short one…really just an announcement of sorts.  But it comes with a preamble.  Here it is…

Have you ever thought about where the fresh air in your home comes from?  If your windows and doors are closed, how are you getting fresh air and expelling stale air?  If you live in an older home, air seeps in through cracks and crevices in your building envelope.  While envelope leakage is detrimental in terms of energy efficiency and possibly occupant comfort (for example, if your home is drafty), in fact, air infiltration can be helpful in terms of indoor air quality.

Image courtesy of Danilo Rizzuti at FreeDigitalPhotos.net

Image courtesy of Danilo Rizzuti at FreeDigitalPhotos.net

But if you live in a new home, whose envelope is airtight, you run the risk of trapping toxins inside your home if you don’t have an explicit means of refreshing the air.  What do I mean by toxins?  I described it in detail in an earlier post.   In a nutshell, toxins find their way in on the bottoms of your shoes (dirt, fertilizers, etc.), as a byproduct of cooking and combustion appliances (like your fireplace), from your furnishings (carpeting, sofa cushions and other furnishings may release volatile organic compounds – VOCs – into the air), and even from your cleaning supplies (check out my earlier article on green cleaning).

New homes – and those that have gone through deep energy retrofits that include air sealing measures – need to use balanced mechanical ventilation to bring fresh air inside and expel stale air to the outdoors.  Mechanical ventilation systems can run through existing ductwork or their own separate ducts (there are significant advantages to this latter design).  I’ll be writing about Sunset Green Home’s ComfoAir system by Zehnder in future articles (which will include installation photos as well). 

But for now, I’ll close with our announcement that we’re co-hosting a two-day workshop next week with Zehnder and Sunset Green Home's builder, Coastal Management, on ventilation systems for energy efficient homes.  The first day will include a three-hour classroom-style presentation on mechanical ventilation and system design.  The second day will be a three-hour installation demonstration at the Sunset Green Home site.  The event is free and open to the trade and industry professionals (CE credit available).  If you’re going to be on Long Island on Tuesday November 18th and Wednesday November 19th and are interested in participating, please send us an email at info@SunsetGreenHome.com so we can forward the details to you.

Join us!  You’ll breathe easier if you know more about where your fresh air comes from.

House Tours: One More Home Arrives to a LEED Platinum Community Rebuilding from Hurricane Katrina

I was in New Orleans last week attending Greenbuild, an annual conference and expo for the sustainable building industry.  The conference ended Friday after three amazing days of classes, inspiring speeches, late-night dancing, networking, and visiting with manufacturers of green building products and technologies.  There was so much to take in that I can only describe it as "drinking from a fire hose!"

With the Greenbuild conference over and a little time on my hands, I knew that the place I wanted to visit was the Lower Ninth Ward, a neighborhood of New Orleans that was particularly hard hit by Hurricane Katrina in 2005.  So I rented a bicycle and set out to see for myself the extent of reconstruction in this hurricane damaged neighborhood. 

If you've been following Sunset Green Home, you know that the project is also in a storm-damaged area - a neighborhood that was badly affected by Hurricane Sandy two years ago today. 

Sunset Green Home after Hurricane Sandy

Sunset Green Home after Hurricane Sandy

The previous house on the site of Sunset Green Home was made uninhabitable by the storm, as were two homes just east of the project site that are still boarded up.  Two more neighbors on adjacent properties have made repairs to their storm-flooded homes and have raised the houses up onto pilings.  Another neighbor next door has demolished a home that was affected by Irene in 2011 and then Sandy in 2012, and has broken ground on a new house.  Everywhere you look in the neighborhood of Sunset Green Home, you are reminded of the havoc a powerful storm can wreak.  So, for me, a visit to the Lower Ninth Ward was imperative.

Coming across the bridge that connects the St. Claude neighborhood to the Lower Ninth Ward, the first thing I saw was the damaged shell of a home that was never repaired after Katrina. 

Hurricane Katrina damaged home in the Lower Ninth Ward, still not repaired after nine years

Hurricane Katrina damaged home in the Lower Ninth Ward, still not repaired after nine years

As I rode on, I was struck by the seeming randomness, block after block, of the wrath of the storm, which left some homes standing while adjacent homes were rendered useless.  I saw boarded up roofs, reminders of the rescues that took place when residents who thought their upper floors would be safe had to break holes in their roofs to escape the rising flood waters.

Hurricane Katrina damaged home, nine years later, standing between two occupied homes

Hurricane Katrina damaged home, nine years later, standing between two occupied homes

And then, after riding along the top of one of the levees, I turned onto a street and saw the first sign of the rejuvenation of the Lower Ninth Ward - a grouping of five single family homes sponsored by Global Green USA and completed from 2008 to 2009.  These energy efficient homes, which are elevated above the ground and include resiliency measures to help protect residents from the next storm, are part of the organization's overall plan to help the community of the Lower Ninth Ward recover from Katrina.

Five homes in the Lower Ninth Ward sponsored by Global Green USA

Five homes in the Lower Ninth Ward sponsored by Global Green USA

A placard on one of the homes explained the technologies and systems included in the homes.

Sustainable features of the Global Green homes

Sustainable features of the Global Green homes

Continuing along the route that had been suggested by the bike rental shop, I rode up Flood Street (a sadly fitting name) to Florida Avenue on the northern border of the neighborhood.

Flood Street in the Lower Ninth Ward

Flood Street in the Lower Ninth Ward

Florida Avenue runs along the edge of the Bayou Bienvenue Wetland Triangle.  According to NOLA.com, the bayou "was once a thriving cypress-tupelo wetland forest that protected the Lower 9th Ward...from hurricane storm surges."  But 20th century development - in particular the completion of the seldom used Mississippi River Gulf Outlet shipping channel in 1965 - permitted saltwater intrusion that eventually decimated the forest and took with it the natural storm surge buffer it represented. 

Bayou Bienvenue Wetland Triangle

Bayou Bienvenue Wetland Triangle

Today there are signs of the post-Katrina restoration efforts that are underway to restore the bayou's protective properties, as evidenced by the newly planted young cypress trees that pepper the bayou.

Bayou Bienvenue Cypress Tree Pilot Program

Bayou Bienvenue Cypress Tree Pilot Program

Continuing on to the northwestern section of the Lower Ninth Ward, I finally found what I had hoped to see - a LEED Platinum community that has resulted from the efforts of the Make It Right Foundation.  Each one of the homes that Make It Right has sponsored in this neighborhood has achieved this extraordinarily high standard in terms of resiliency, energy efficiency, water efficiency, indoor air quality and other sustainability measures. 

The homes are attractive and seem well cared for by their occupants.  Clustered together, they serve as beacons in the neighborhood - encouraging us to think about what will be rather than what has befallen the area. 

Make It Right's LEED Platinum community in the Lower Ninth Ward

Make It Right's LEED Platinum community in the Lower Ninth Ward

At Greenbuild, I had the pleasure of touring the next Make It Right Foundation home destined for the Lower Ninth Ward.  A modular construction by LivingHomes, with sustainable technologies and products donated by numerous manufacturers (such as Advanta Cabinets, Andersen Windows, CertainTeed, Electrolux and Kohler, the project's Platinum Sponsors), the home will be energy efficient, water efficient and have healthy indoor air quality for its occupants. 

I was thrilled when I stopped to speak with a construction crew that was working on a raised piling foundation and learned that the Greenbuild Make It Right home would be delivered to that site the next day.  I had to go back!

Pilings under construction for Make It Right's newest home

Pilings under construction for Make It Right's newest home

So, Sunday morning before I left for the airport, I took a second trip to the Lower Ninth Ward to see the installation in progress.  One of three sections of the modular home had been delivered, and the remaining sections were due later in the day. 

Delivery of the first section of Make It Right's newest home

Delivery of the first section of Make It Right's newest home

I spoke with a member of the construction crew who told me that they hoped to set the three pieces in place Sunday.  Linking them together and completing the construction would take several additional days.  By the end of this week, there will be one more home in a growing LEED Platinum neighborhood.

LivingHome rendering courtesy Hanley Wood

LivingHome rendering courtesy Hanley Wood

The Lower Ninth Ward still bears the scars of Hurricane Katrina, and as of 2014, nine years after the storm, more homes are still boarded up or have been demolished than have been rebuilt.  But Make It Right Foundation's LEED Platinum community in the Lower Ninth Ward is demonstrating that we have the ability in the 21st century to build resilient, healthy, energy efficient, affordable communities.

Practical Sustainability: The Cost of Cleaning Green...It's Lower Than You Think!

I am the first to admit that I’ve come late to the “green” cleaning party.  I’ve been buying organic groceries and local produce for years…but I’m a creature of habit and I just haven’t found the time to look for new cleaning products.  And I also figured it would probably be expensive to make the switch to products that might not clean as well as what I already had on hand.  If you’re like me, and you haven’t gotten around to changing your cleaning supplies, it's time to think again! 

We are building Sunset Green Home to LEED® for Homes standards (LEED stands for Leadership in Energy and Environmental Design).  The house will have a very tight building envelope with minimal air leakage, which makes it more difficult for toxins that enter the home to find their way out.  So the LEED® for Homes green building program prescribes a number of ways to maintain healthy indoor air quality (read my earlier article on indoor air quality here) - including keeping toxins from entering the home in the first place.  LEED also provides strategies for keeping pollution out of our community's fresh water sources.  Combine these two elements of the LEED program, and it makes no sense to bring toxic cleaning supplies into Sunset Green Home only to have them either dissipate into the air or be flushed down our sinks and toilets.

With indoor air quality and clean waterways in mind, I recently set out to understand the availability of highly rated non-toxic cleaning supplies that are safer for the environment.  

First I took a walk down my own hall of shame and identified 10 cleaning products in my home that were given a failing grade of “F” by the Environmental Working Group (EWG), a non-profit organization whose Guide to Healthy Cleaning “analyzes toxicity and safety information relevant to human health and the environment and gives cleaners a letter grade corresponding to how well or poorly they rate.”  Next, I identified a product in each of the categories represented by the products in my cleaning cupboard that had received a grade of “A” from EWG.  I looked up both products on Amazon.com, converted to a unit price (for example, price per load for laundry detergent pods), and made the price comparison (I included the cost of shipping if an item was not available in the Amazon Prime subscription delivery service).  I tallied things up across all of the categories using a quantity that represented my best guess at our household’s annual consumption. 

Here are the results (click here to open as a PDF)…

What I learned is that I can use "A" rated cleaning products for essentially the same total annual cost of using brand name products that receive failing grades.

In case you’re wondering how these environmentally friendly cleaning products stack up against the competition in terms of their ability to get the job done, all but two of the “A” graded products I used for my comparison carries a rating greater than 4 out of 5 on Amazon.com. If you want to learn more about the safety and effectiveness of green cleaning products, check out organizations like Consumer Reports, the Natural Resources Defense Council, and the Environmental Working Group.    

In researching this article, I reached out to Peter Graham, the Chairman of the Board of Seventh Generation, one of the leading companies in the healthy cleaning products industry.  He stressed that, in formulating its products, his company practices the "Precautionary Principle," telling me that Seventh Generation "will not use a chemical in our formulations unless it is proven safe."  The Seventh Generation Blog explains "So what is the 'precautionary principle' all about? Basically, if an action is suspected to cause harm to the public or to the environment, those taking the action must prove that it is not harmful. That means corporations or governments must take responsibility that their products and policies do not cause harm to people or to the environment. The principle implies that there is a social responsibility to protect the public from exposure to harm."  

Seventh Generation is not alone, and the cleaning products industry is changing for the better.  The American Cleaning Institute, whose vision is to enhance "health and the quality of life through sustainable cleaning products and practices" highlights its members' sustainability initiatives and successes and provides information on steps consumers can take to make better cleaning product purchasing and disposal decisions.  

So what are you waiting for?  "Green" cleaning products work.  They’re not more expensive. And did I mention that they’re better for human health and for the environment?  So the next time you need to buy detergent or glass cleaner or multi-purpose surface wipes, make a change to green cleaning products.  The environment will thank you...and so will your pocketbook!

Sunset Green Home Progress Update: Constructing a High Performance Roof

Sunset Green Home's roofing subcontractor, J.P. Hunter Roofing, arrived on the scene yesterday!  So over the coming weeks we will start to see the finished exterior of the house take form.  I'll post updates as the work moves forward, but today's Progress Update focuses on Sunset Green Home’s strategy for creating a high performance, durable coastal roof.  There are many possible high quality roof assemblies - ranging from ENERGY STAR rated asphalt to durable slate to metal roofing. 

But one type of roof - natural cedar - is traditionally found in the coastal areas of Long Island.  Sunset Green Home has elected to use a natural cedar roof on the main house (stay tuned for a post on the standing seam metal roof we're installing on the pool house).  A natural cedar roof has the added benefit of being energy efficient and resistant to wind. 

So what does Sunset Green Home’s roof assembly include?

Roof Sheathing

I’ve written over the past few weeks about Huber Engineered Woods' ZIP System sheathing, and how it helps Sunset Green Home achieve an airtight shell (a “must” for a LEED certified home) and provides continuous sheathing required for wind-resistant construction.  ZIP System sheathing is the base layer of Sunset Green Home’s roof system.

Huber Engineered Woods' ZIP System sheathing on Sunset Green Home's roof

Huber Engineered Woods' ZIP System sheathing on Sunset Green Home's roof

Ice & Water Shield

Grace Ice & Water Shield, a self-adhering rubberized asphalt underlayment is the next important layer, as it is “designed to protect homes from wind-driven rain and ice dams.”  Installed at the most vulnerable areas of the roof (e.g., at the eaves, rakes and valleys), it helps to prevent ice damming and also forms a watertight seal around the nails that are used to adhere the roof shingles to the sheathing, thereby reducing the likelihood of a roof leak.

Rolls of Grace Ice &amp; Water Shield for Sunset Green Home's roof

Rolls of Grace Ice & Water Shield for Sunset Green Home's roof

Flashing

Lead coated copper flashing is another important roofing component and is used for its ability to hold up against the elements as well as its ability to be soldered.  The product is used at the connection of the sloped roof to the sidewalls (with "step flashing" to the walls where the walls are terminated with "apron flashing").  It is also installed around the chimney area and is custom fabricated into roof boots for all plumbing vents that protrude through the roof.

Sheets of lead-coated copper flashing

Sheets of lead-coated copper flashing

Drainage Plane and Air Gap 

Ventgrid12™ is the third underlayment on Sunset Green Home’s roof.  Made of recycled - and recyclable - polyolefin, Ventgrid12™ is a rigid sheet in a 2” grid pattern that acts as a drainage plane and air gap between the roof deck and the roof shingles.  According to Ventgrid, “the sun’s intensity has increased dramatically in recent years...as a result, unprecedented heat build-up commonly occurs between the shingles and the roof sheathing causing degradation in the form of splitting, cracking, curling, warping and cupping resulting in significant openings for water to pour in." In addition to providing an air gap for heat control, a "secondary benefit is the drainage plane that is formed by installing Ventgrid12™ behind the roofing materials, thereby creating another layer of protection for the structure itself.”

Ventgrid drainage plane and air gap, made from 100% recycled material

Ventgrid drainage plane and air gap, made from 100% recycled material

Roof Shingles

Sunset Green Home’s roof will be finished with SFI certified 5/8” thick taper sawn Western Red Cedar shingles from Anbrook Industries.  The butts of taper sawn shingles are thicker than a 3/8” thick cedar perfection shingle, which is often used on a cedar roof.  Because of its additional thickness, a taper sawn shingle will perform better when subjected to the sun’s UV rays and the moist weather conditions of Sunset Green Home’s coastal location.

Anbrook's durable taper sawn shingles with 5/8" butts

Anbrook's durable taper sawn shingles with 5/8" butts

In addition to their SFI certification, Anbrook’s shingles carry the “Certi” label, which indicates that the mill manufactures its products according to standards set by the Cedar Shake and Shingle Bureau (CSSB), a non-profit industry organization, and voluntarily submits to random inspections by agencies contracted by CSSB. 

"Certi" label on Anbrook's Western Red Cedar taper sawn roof shingles

"Certi" label on Anbrook's Western Red Cedar taper sawn roof shingles

Stainless Steel Nails

The shingles will be attached to the rest of the roof assembly using Simpson Strong-Tie’s type 316 Stainless Steel nails, which resist corrosion and are manufactured especially for seaside applications. 

Simpson Strong-Tie type 316 Stainless Steel nails for coastal applications

Simpson Strong-Tie type 316 Stainless Steel nails for coastal applications

Taken together, the elements of Sunset Green Home’s roof form a durable, energy efficient and environmentally friendly assembly – and a beautiful roof that Sunset Green Home will enjoy for many years to come.